



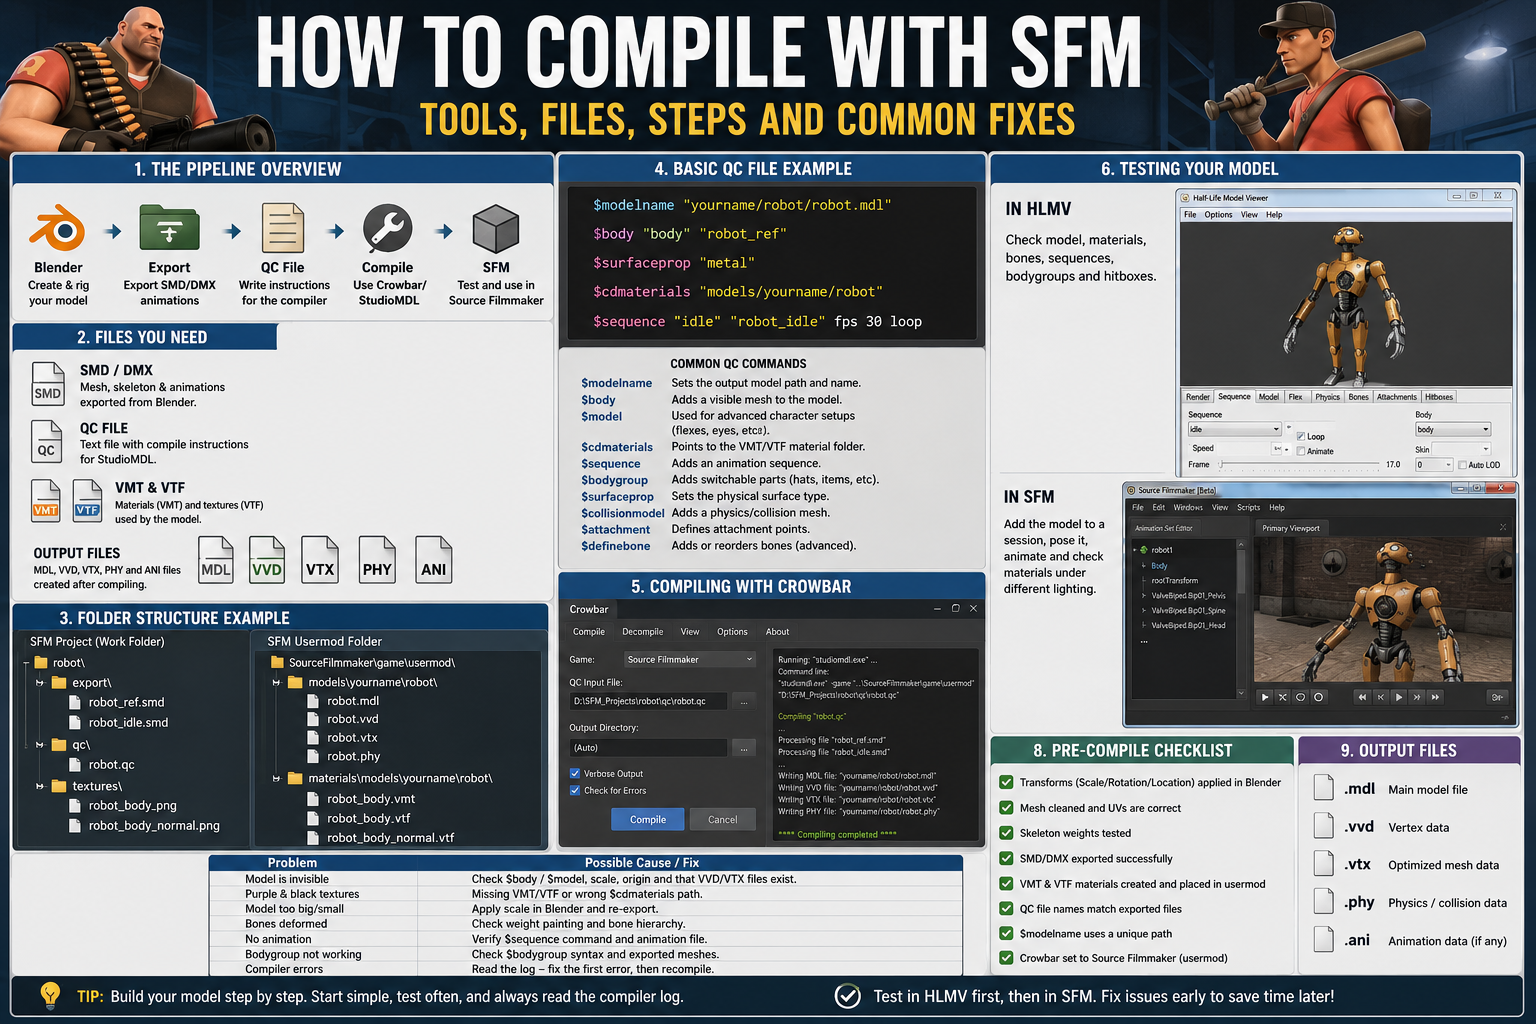
Learning how to compile with SFM can feel more complicated than creating the model itself.
You may finish the mesh in Blender, set up the skeleton, add textures and test the movements, only to discover that Source Filmmaker cannot open the project. The model might appear invisible, load without textures or refuse to compile because one file is in the wrong folder.
This happens because SFM cannot use a Blender project, FBX file or OBJ model directly. The asset must first pass through the Source Filmmaker model compilation process.
During this process, the editable model is exported into a Source-compatible format, paired with a QC file and processed by StudioMDL. Tools such as Crowbar make the process easier by providing a visual interface for the compiler.
Once everything is set up correctly, the workflow becomes much more manageable:
- prepare the model in Blender;
- export the mesh and animations;
- organise the textures and materials;
- create the QC instructions;
- compile the model;
- test it in HLMV and Source Filmmaker;
- fix any warnings or visual problems.
The key is to start with a simple version of the model and add advanced features gradually.
What Does Compiling With SFM Mean?
When people search for how to compile with SFM, they are normally trying to convert a custom model into a format Source Filmmaker can recognise.
A Blender file contains editable information for Blender. Source Filmmaker uses a completely different model system built around the Source Engine.
The compilation process takes files containing the mesh, bones and animations, then turns them into the finished model files used inside SFM.
These source files may include:
- SMD files for meshes and skeletal animations;
- DMX files for richer model and facial data;
- VTA files for vertex animation and facial flexes;
- a QC script containing the compiler instructions;
- VMT and VTF files for the model’s materials and textures.
The compiler reads these files and creates the model that appears inside Source Filmmaker.
Compilation is therefore more than a simple file conversion. It tells the Source Engine how the model should behave, where its materials are stored and which animations or optional parts belong to it.
Model Compilation Is Not the Same as Rendering
SFM users often use similar words for very different tasks.
Model compilation prepares a custom model for Source Filmmaker.
Map compilation converts a Hammer map project into a Source map.
Rendering exports an SFM animation or poster as an image sequence or video.
This guide focuses on how to compile a model for SFM, not how to export a finished animation.
You do not need Crowbar or StudioMDL simply to render a movie. You need them when you are creating, modifying or importing a model for the Source Engine.
The Main Tools Used for SFM Compilation
A typical Blender to SFM workflow uses several tools, but most of them are free.
Source Filmmaker
Source Filmmaker is where the finished model will eventually be posed, animated and rendered.
It is built inside the Source Engine, which means models must follow Source-specific formats, folder structures and material rules.
SFM also includes the version of StudioMDL used to compile models for its engine branch. Choosing the correct compiler matters because model commands and limits can vary between Source games.
A model compiled for another game is not guaranteed to behave correctly in Source Filmmaker.
Blender
Blender is commonly used to prepare custom SFM assets.
Inside Blender, you can:
- create or edit the mesh;
- build the skeleton;
- paint bone weights;
- prepare UV maps;
- assign material names;
- create animations;
- make facial shape keys;
- adjust the model’s size and orientation.
The Blender project itself is not the file that gets compiled. It is the editable source from which the SMD or DMX files are exported.
Blender Source Tools
Blender Source Tools connects Blender with the Source Engine workflow.
The add-on allows creators to export models and animations in formats that StudioMDL understands.
Depending on the project, it may export:
- reference meshes;
- skeletal animations;
- facial animation data;
- shape keys;
- SMD files;
- DMX files;
- VTA files.
Without a Source-compatible export tool, Blender cannot prepare the files required for an SFM compile.
StudioMDL
StudioMDL is the actual Source model compiler.
It reads the QC instructions, locates the exported model files and creates the finished Source model.
StudioMDL is a command-line tool, which can make it intimidating for beginners. However, most users do not need to interact with it directly because Crowbar can handle the compiler setup.
Even when Crowbar is used, StudioMDL is still doing the compilation in the background.
Crowbar
The Crowbar model compiler is one of the most popular tools for Source model creation.
It gives users a simpler interface for:
- selecting the target Source game;
- choosing a QC file;
- running StudioMDL;
- viewing warnings and errors;
- decompiling existing models;
- checking model-related files.
Crowbar does not create the mesh or textures. Its job is to make the Source compilation process easier to control.
For beginners, it is usually the most practical way to compile a custom SFM model.
Half-Life Model Viewer
Half-Life Model Viewer, often called HLMV, allows you to inspect the compiled model before loading it into a large SFM project.
You can use it to check:
- scale;
- orientation;
- textures;
- bones;
- animations;
- bodygroups;
- skins;
- facial flexes;
- hitboxes;
- attachments.
Testing in HLMV can save time because it makes many problems visible immediately.
If the model does not open properly in HLMV, it is unlikely to work correctly in Source Filmmaker.
Material and Texture Tools
Source models normally use VMT and VTF files rather than ordinary PNG or JPG images.
The VTF stores the texture image.
The VMT tells the Source Engine how the material should behave. It can control details such as:
- the main texture;
- normal maps;
- reflections;
- transparency;
- shine;
- phong lighting;
- surface appearance.
A texture may look perfect in Blender but still appear missing in SFM if it has not been converted and placed correctly.
Understanding the Main SFM Model Files
The compilation workflow becomes easier once you understand what each file does.
SMD Files
An SMD model export can store a reference mesh, skeleton or animation.
A character project may use one SMD for the body and separate SMD files for its idle, walking or posing animations.
SMD remains popular because it is widely supported and works well for many standard props and rigged characters.
It is often the easiest format for beginners learning SFM model compilation.
DMX Files
A DMX model export can carry more detailed Source data than a traditional SMD workflow.
DMX is particularly useful for models involving:
- advanced facial flexes;
- corrective shapes;
- complex character data;
- wrinkle maps;
- richer Source animation information.
DMX is not automatically required for every model. A basic prop or ordinary rigged character may work perfectly well with SMD.
The right choice depends on the features the model needs.
VTA Files
VTA files are commonly associated with vertex animation and facial expressions.
You may encounter them while:
- creating facial flexes;
- exporting Blender shape keys;
- editing a character model;
- recompiling an existing Source asset.
A static prop does not need facial animation files, so VTA is not part of every workflow.
QC Files
The SFM QC file controls the compile.
It tells StudioMDL:
- what the finished model should be called;
- which mesh should be visible;
- where the materials are located;
- which animation sequences to include;
- whether the model has bodygroups;
- which surface type it uses;
- whether it needs collision data;
- which attachments, flexes or hitboxes should be included.
The QC file is not traditional programming. It uses a specialised collection of QC commands recognised by StudioMDL.
A small typing mistake inside this file can prevent the entire compile from completing.
VMT and VTF Files
The VTF texture file holds the image data used by the material.
The VMT material file tells Source how to display that texture.
The name assigned to a material in Blender should normally match the name of the corresponding VMT file.
The material path inside the model must also match the real folder location.
When Source cannot find the required material, the model usually appears with the familiar purple-and-black checkerboard texture.
Files Created After Compilation
A successful compile usually creates several related files.
The main MDL file stores important model information, but it does not work alone.
The finished model may also include:
- a VVD file containing vertex data;
- one or more VTX files containing optimised mesh information;
- a PHY file containing optional collision data;
- an ANI file containing external animation information.
These files should remain together.
Moving only the MDL file can cause the model to appear invisible, broken or unreadable.
Organising Your SFM Model Folders
Poor folder organisation causes many avoidable compile problems.
Keep the editable project separate from the files used directly by SFM.
Your working folder should contain clear sections for:
- the Blender project;
- exported SMD or DMX files;
- animations;
- textures;
- material files;
- the QC file;
- compiled output.
The finished model should use a unique folder inside the SFM models directory.
A good path includes your creator name and the project name. This reduces the chance of overwriting a Valve model or conflicting with a Workshop asset.
The materials should follow a matching structure inside the SFM materials directory.
Using clear, unique paths is especially important when working on several models at once.
Preparing the Model in Blender
A successful compile begins before Crowbar is opened.
Apply the Model’s Scale and Rotation
Unapplied transforms can make the compiled model appear:
- extremely large;
- almost invisible because it is too small;
- rotated sideways;
- lying on the ground;
- positioned far from the scene origin.
Apply the model’s scale and rotation in Blender before export.
It is usually better to correct the source model than to rely on compiler commands to repair its size later.
A clean source scale also helps keep animations, bodygroups and attachments consistent.
Check the Model’s Position
Place the mesh and armature near the Blender world origin.
A model can compile correctly while still appearing missing because its geometry is far away from its origin.
For a character, the feet should normally sit near the floor level. For a prop, the origin should be placed where you want the object to rotate or rest.
Clean the Mesh
Inspect the model for problems such as:
- duplicate vertices;
- reversed normals;
- broken faces;
- unused geometry;
- missing UV maps;
- unnecessary material slots;
- unapplied modifiers;
- disconnected mesh sections.
Source models eventually render as triangles, so complicated topology should be checked carefully.
Faces, fingers, shoulders and joints deserve extra attention because poor triangulation or geometry can become more visible during animation.
Check Material Names
Use simple material names that are easy to match with VMT files.
Avoid:
- spaces;
- special characters;
- inconsistent capital letters;
- very long names;
- duplicate materials with slightly different spellings.
A material called “body” in Blender should not point towards a VMT named “body_material_final2” unless the export setup is deliberately configured that way.
Consistent naming prevents many SFM missing texture problems.
Prepare the Skeleton
A rigged model needs a clean Source Engine bone hierarchy.
Check that:
- each bone has the correct parent;
- deforming bones influence the correct mesh;
- the reference model and animations use the same armature;
- duplicate bone names have been removed;
- unnecessary control bones are handled carefully;
- the model can be posed correctly in Blender.
A custom model does not always need the ValveBiped skeleton.
Valve-style names are useful when you want compatibility with existing animations or rigs, but custom skeletons can still work in SFM.
Test the Bone Weights
Move the model into difficult poses before exporting.
Pay close attention to:
- elbows;
- knees;
- shoulders;
- wrists;
- fingers;
- neck;
- hips.
Poor weights can make the mesh stretch, collapse or follow the wrong bone.
If the model is already breaking in Blender, compiling it will not repair the deformation.
Prepare Facial Flexes Separately
Facial animation is one of the more advanced parts of how to compile with SFM.
Shape keys and facial flexes may be exported through VTA or DMX workflows.
Do not begin by trying to compile a character with every expression, eyelid and mouth movement active.
First compile the basic model.
Once the mesh, skeleton and materials work correctly, add:
- simple expressions;
- eyelid controls;
- eye movement;
- phonemes;
- corrective shapes;
- flex controllers.
This staged approach makes errors much easier to trace.
Exporting the Model From Blender
Once the model is prepared, use Blender Source Tools to export the Source files.
Export the Reference Mesh
The reference export contains the model’s normal mesh and skeleton.
Make sure:
- the correct mesh is selected;
- the correct armature is active;
- the model is not hidden from export;
- the export destination is correct;
- the file is actually created.
An unusually small export file may mean the mesh was not included.
Export Animations Separately
Each animation can be exported as its own SMD or DMX file.
Check:
- the frame range;
- frame rate;
- looping behaviour;
- active skeleton;
- beginning and ending pose.
Animations should use the same compatible bone structure as the reference mesh.
A mismatched skeleton can cause missing sequences or severe deformation.
Export Facial Data
When the character uses shape keys, configure the correct VTA or DMX facial workflow.
Begin with one test expression.
Once that flex appears correctly in HLMV, expand the system gradually.
Writing the QC File
The QC file brings the whole project together.
A basic SFM QC file usually needs instructions for:
- the model’s output name;
- the visible body mesh;
- the material folder;
- the surface type;
- at least one animation sequence.
The filenames written in the QC must match the exported files.
Material paths must point to the real VMT location relative to the SFM materials folder.
The output path should be unique and should not overwrite an existing model.
Essential QC Commands
Model Name
The model-name instruction controls where the compiled model is placed and what it is called.
Use a clear path containing your creator or project name.
Avoid copying the path of a Valve model or Workshop asset.
Body or Model Definition
A basic visible mesh is usually added through a body definition.
More advanced character setups may use a model definition when facial flexes, eyes and other detailed features are involved.
Do not replace one with the other simply because the compile failed. They serve different purposes and may require different supporting instructions.
Material Directory
The material-directory instruction tells Source where to look for the VMT files.
The path is relative to SFM’s main materials folder.
It should point to the folder containing the VMT files, not the folder containing the original PNG textures.
Animation Sequence
The model normally needs at least one animation sequence.
A character may use a separate idle animation.
A simple prop can often use its reference mesh as a basic idle sequence.
Without a valid sequence, the model may compile with errors or behave unexpectedly.
Surface Property
The surface property describes the general physical material, such as metal, wood, flesh or plastic.
It is less important for a model used only for posing, but it helps keep the Source asset properly defined.
Adding Bodygroups
SFM bodygroups allow parts of a model to be switched on or off.
They can be used for:
- hats;
- hair styles;
- jackets;
- weapons;
- alternate hands;
- masks;
- accessories.
Each bodygroup mesh should use a skeleton compatible with the main model.
Test every part individually before combining several bodygroups into one compile.
Adding Collision Data
A collision model is optional for many SFM assets.
A character used only for posing and animation may not need detailed physics geometry.
When collision is required, use a simplified mesh rather than the full visible model whenever possible.
Complex collision geometry can create unnecessary compiler warnings and performance problems.
Adding Attachments
Attachments provide named points for effects and objects.
They may be used for:
- particles;
- muzzle flashes;
- weapons;
- props;
- lights;
- other scene elements.
An attachment can exist in the model but still appear in the wrong location if its bone, direction or offset is incorrect.
Always inspect attachments in HLMV.
Adding Hitboxes and LODs
Hitboxes are mainly important for game interaction, though they may also help with compatibility.
Level-of-detail models replace complex geometry with simpler versions at a distance.
Neither feature is necessary for a first test compile.
Get the main mesh working before adding optional technical features.
Compiling the Model With Crowbar
Open Crowbar and select Source Filmmaker as the target game.
Make sure Crowbar is using SFM’s own StudioMDL compiler and the correct usermod directory.
Then select the QC file and start the compile.
Crowbar will display the StudioMDL output.
Read the entire log rather than checking only whether the process reached the end.
Search for warnings and errors.
The first clear error is usually the most useful because later messages may be caused by the same missing file or incorrect command.
For example, one incorrect source filename may produce several additional warnings later in the log.
Fix the first problem, compile again and see which messages remain.
Compiling Directly With StudioMDL
Advanced users may prefer to run StudioMDL through the command line.
This method can be useful when:
- testing whether Crowbar is configured correctly;
- compiling several models automatically;
- creating batch processes;
- reading the compiler output directly;
- maintaining a more technical workflow.
Crowbar and command-line StudioMDL use the same underlying compiler.
Crowbar is simply easier for users who do not want to manage command paths manually.
Testing the Model in HLMV
Open the compiled model in Half-Life Model Viewer.
Check the model from several angles and under different tabs.
Inspect:
- geometry;
- textures;
- bone names;
- animations;
- skins;
- bodygroups;
- flexes;
- hitboxes;
- attachments.
When the model has purple-and-black textures, focus on the material files and paths.
When the model is invisible, check the mesh export, scale, origin and supporting compiled files.
When the model opens correctly in HLMV, move on to Source Filmmaker.
Testing the Model Inside SFM
Create a small test session rather than opening a large animation project.
Add the model through SFM’s model browser.
Check whether:
- the model appears;
- the bones can be posed;
- animations play correctly;
- textures respond to lighting;
- bodygroups can be changed;
- facial controls appear;
- the model remains stable after saving.
Restart SFM after compiling when the model does not appear immediately. The model browser may not always refresh newly created assets during the same session.
Common SFM Compilation Problems
The QC File Will Not Compile
A failed QC file may contain:
- a misspelled command;
- a missing quotation mark;
- an unmatched bracket;
- the wrong source filename;
- an invalid path;
- a command from another Source version;
- an incorrect file extension.
Check that the QC was saved as a plain QC file rather than a hidden text document.
Remove optional commands and return to the simplest possible compile.
Once the model works, add the additional sections again one at a time.
StudioMDL Cannot Find the SMD or DMX
Check whether:
- the filename is correct;
- the export file exists;
- the file was moved;
- the extension is correct;
- the QC points to the right folder;
- Blender exported to the intended location.
Small filename differences are enough to stop the compile.
Use simple names and keep the source files near the QC during the early stages of the project.
The Model Is Invisible in SFM
A model invisible in SFM may be caused by:
- an empty reference export;
- no valid body definition;
- extreme scale;
- geometry far from the origin;
- missing VVD or VTX files;
- output compiled into the wrong folder;
- model bounds that do not cover the mesh.
Open the asset in HLMV.
When it is also invisible there, return to Blender and inspect the mesh export.
When it works in HLMV but not SFM, check the game folder and model search path.
The Model Has Purple-and-Black Textures
The purple-and-black checkerboard means Source cannot find or load the material.
Check:
- whether the VMT exists;
- whether the VTF exists;
- whether the material path is correct;
- whether the Blender material name matches the VMT name;
- whether the files are inside the active SFM materials folder;
- whether the texture path inside the VMT is accurate.
Changing the model geometry will not fix a missing material path.
The Model Is Too Large or Too Small
Return to Blender and check the scale.
Apply the transforms and compare the model against a known Source character or prop.
Export and compile it again.
Correcting scale in the original project is normally more reliable than applying a permanent compiler workaround.
The Model Is Rotated Incorrectly
Check the mesh and armature orientation together.
Applying rotation only to the mesh can cause it to separate from the skeleton during animation.
Correct the orientation in Blender, apply the transforms and export a new reference model.
Bones Are Missing
StudioMDL may remove bones that appear unused.
A bone may be considered unused when it does not influence vertices, move in an animation or support an attachment.
Check whether the bone is genuinely required.
Advanced projects may need bone-definition instructions, but basic models should first be tested through a normal mesh and skeleton export.
The Mesh Stretches When Posed
Stretching is usually caused by poor weight painting.
Inspect the model in Blender and check for vertices influenced by the wrong bones.
Normalise the weights and test difficult poses again.
The compiler cannot repair incorrect vertex weights.
Bodygroups Do Not Work
Check:
- the bodygroup structure in the QC;
- the exported mesh names;
- the skeleton used by each part;
- whether the alternate meshes were exported;
- whether the bodygroup is selected in HLMV or SFM.
Test the optional part as an ordinary visible mesh. When it still does not appear, the export is probably the problem.
Facial Flexes Are Missing
Check whether:
- the shape keys were exported;
- the VTA or DMX facial data exists;
- the advanced model definition is correct;
- flex names match;
- HLMV displays the flex controllers.
Start with one expression.
A working test flex is easier to build upon than a complete broken facial system.
The Model Has No Animations
Check:
- whether an animation sequence was added;
- whether the animation file exists;
- whether the frame range contains movement;
- whether the animation uses the correct skeleton;
- whether the sequence appears in HLMV.
A static model should still have a simple idle sequence.
SFM Crashes When Loading the Model
A crash can be caused by:
- damaged compile output;
- unsupported model data;
- missing supporting files;
- excessive geometry;
- broken flex definitions;
- invalid animation data;
- problematic material settings.
Create a simplified version containing only:
- one mesh;
- one material;
- one skeleton;
- one idle sequence.
When that version works, rebuild the advanced features gradually.
The Compiler Reports Model Limits
Source 1 has technical limits involving:
- vertices;
- mesh sections;
- materials;
- bones;
- bone influences;
- flex data;
- animation data.
Remove geometry that does not affect the final appearance.
Combine unnecessary materials where practical.
Split an extremely complicated asset into sensible sections or bodygroups.
Avoid relying on one triangle limit taken from an unrelated Source game because the actual problem can depend on how the model is structured.
The Materials Look Too Shiny or Transparent
This is usually a VMT material setup problem rather than a failed model compile.
Review:
- the selected shader;
- phong settings;
- reflections;
- environment maps;
- transparency;
- alpha channels;
- normal-map settings.
Material files can usually be edited without recompiling the model.
Reload the asset or restart SFM to see the updated appearance.
A Better Way to Troubleshoot SFM Models
Do not build every feature before the first compile.
Use a staged workflow.
Begin with the base mesh and one material.
Then add the skeleton.
After that, add one animation.
Once those parts work, introduce bodygroups, flexes, attachments, hitboxes, collision and LODs.
Save a copy of every stable QC file.
When a new feature breaks the model, compare the current version with the last working file.
This method is much faster than trying to solve several unrelated errors at once.
SMD or DMX: Which Format Should You Choose?
Use SMD when:
- the model is relatively simple;
- you need ordinary skeletal animation;
- you are creating a standard character or prop;
- your existing workflow already uses SMD;
- you want an accessible beginner setup.
Use DMX when:
- the character needs advanced facial data;
- you are using corrective shapes;
- the project contains richer Source information;
- Blender Source Tools is already configured for DMX;
- the existing source files depend on DMX features.
Changing from SMD to DMX will not fix an incorrect folder, missing material or broken QC instruction.
Choose the format that supports the features you actually need.
Before You Compile
Check that:
- scale, rotation and location have been applied;
- the model is positioned correctly;
- the mesh is clean;
- UV maps are complete;
- normals face the correct direction;
- material names are consistent;
- the skeleton hierarchy works;
- bone weights have been tested;
- the reference model was exported;
- animations use the same skeleton;
- VMT and VTF files are ready;
- the QC uses the correct filenames;
- the material folder is correct;
- the model output path is unique;
- Crowbar is set to Source Filmmaker;
- no default or Workshop asset will be overwritten.
After You Compile
Check that:
- the compile log has no serious errors;
- the MDL file exists;
- the VVD and VTX files exist;
- the model opens in HLMV;
- the scale and orientation are correct;
- materials appear;
- bones can be moved;
- animations play;
- bodygroups work;
- facial flexes appear;
- the model loads in a clean SFM session;
- the model still works after the session is saved and reopened.
What Does SFM Compile Mean?
SFM compile means converting editable model assets into Source Engine files that Source Filmmaker can load.
The process usually combines:
- an SMD or DMX model;
- optional animation and facial files;
- a QC instruction file;
- VMT and VTF materials;
- the StudioMDL compiler.
The finished model normally includes an MDL file and several supporting files containing its geometry, vertices, animation or collision data.
The phrase is sometimes confused with rendering an SFM movie, but the two processes are different.
Is SFM Harder Than Blender?
SFM and Blender are designed for different types of work.
Blender is a complete 3D creation suite used for modelling, sculpting, rigging, animation, simulation and rendering.
Source Filmmaker focuses more closely on posing, animation, cinematography and scene creation using Source assets.
Using existing models in SFM can be easier than building a character in Blender.
However, creating a custom model requires users to understand Blender as well as the Source Filmmaker compilation pipeline.
The difficult part is often not the modelling itself. It is learning the QC commands, Source materials, folder structure and compiler messages.
What Coding Language Does SFM Use?
A standard SFM model compilation does not require traditional coding.
QC files use a specialised command-based format read by StudioMDL.
Creators can also use Python for certain SFM scripts, rigs and automation tools.
The wider Source Engine and Source SDK are primarily associated with C++, but ordinary model creators do not need to learn C++ simply to compile a custom character or prop.
Is SFM Still Used?
Source Filmmaker is still used by creators making:
- fan animations;
- machinima;
- game-based films;
- posters;
- memes;
- music videos;
- custom models;
- character showcases;
- Source Engine cinematics.
The software is older than many modern animation programs, and its Source 1 workflow can feel dated.
However, its large asset library, Steam Workshop content and familiar posing tools continue to make it useful for creators working with Team Fortress 2, Half-Life and other Source-based communities.
